AutoFlip: Saliency-aware Video Cropping
Table of contents
Overview
AutoFlip is an automatic video cropping pipeline built on top of MediaPipe. This example focuses on demonstrating how to use AutoFlip to convert an input video to arbitrary aspect ratios.
For overall context on AutoFlip, please read this Google AI Blog.
Building
Run the following command to build the AutoFlip pipeline:
Note: AutoFlip currently only works with OpenCV 3. Please verify your OpenCV version beforehand.
bazel build -c opt --define MEDIAPIPE_DISABLE_GPU=1 mediapipe/examples/desktop/autoflip:run_autoflip
Running
GLOG_logtostderr=1 bazel-bin/mediapipe/examples/desktop/autoflip/run_autoflip \
  --calculator_graph_config_file=mediapipe/examples/desktop/autoflip/autoflip_graph.pbtxt \
  --input_side_packets=input_video_path=/absolute/path/to/the/local/video/file,output_video_path=/absolute/path/to/save/the/output/video/file,aspect_ratio=1:1
Use the aspect_ratio flag to provide the output aspect ratio. The format should be width:height, where the width and height are two positive integers. AutoFlip supports both landscape-to-portrait and portrait-to-landscape conversions. The pipeline internally compares the target aspect ratio against the original one, and determines the correct conversion automatically.
We have put a couple test videos under this Google Drive folder. You could download the videos into your local file system, then modify the command above accordingly to run AutoFlip against the videos.
MediaPipe Graph
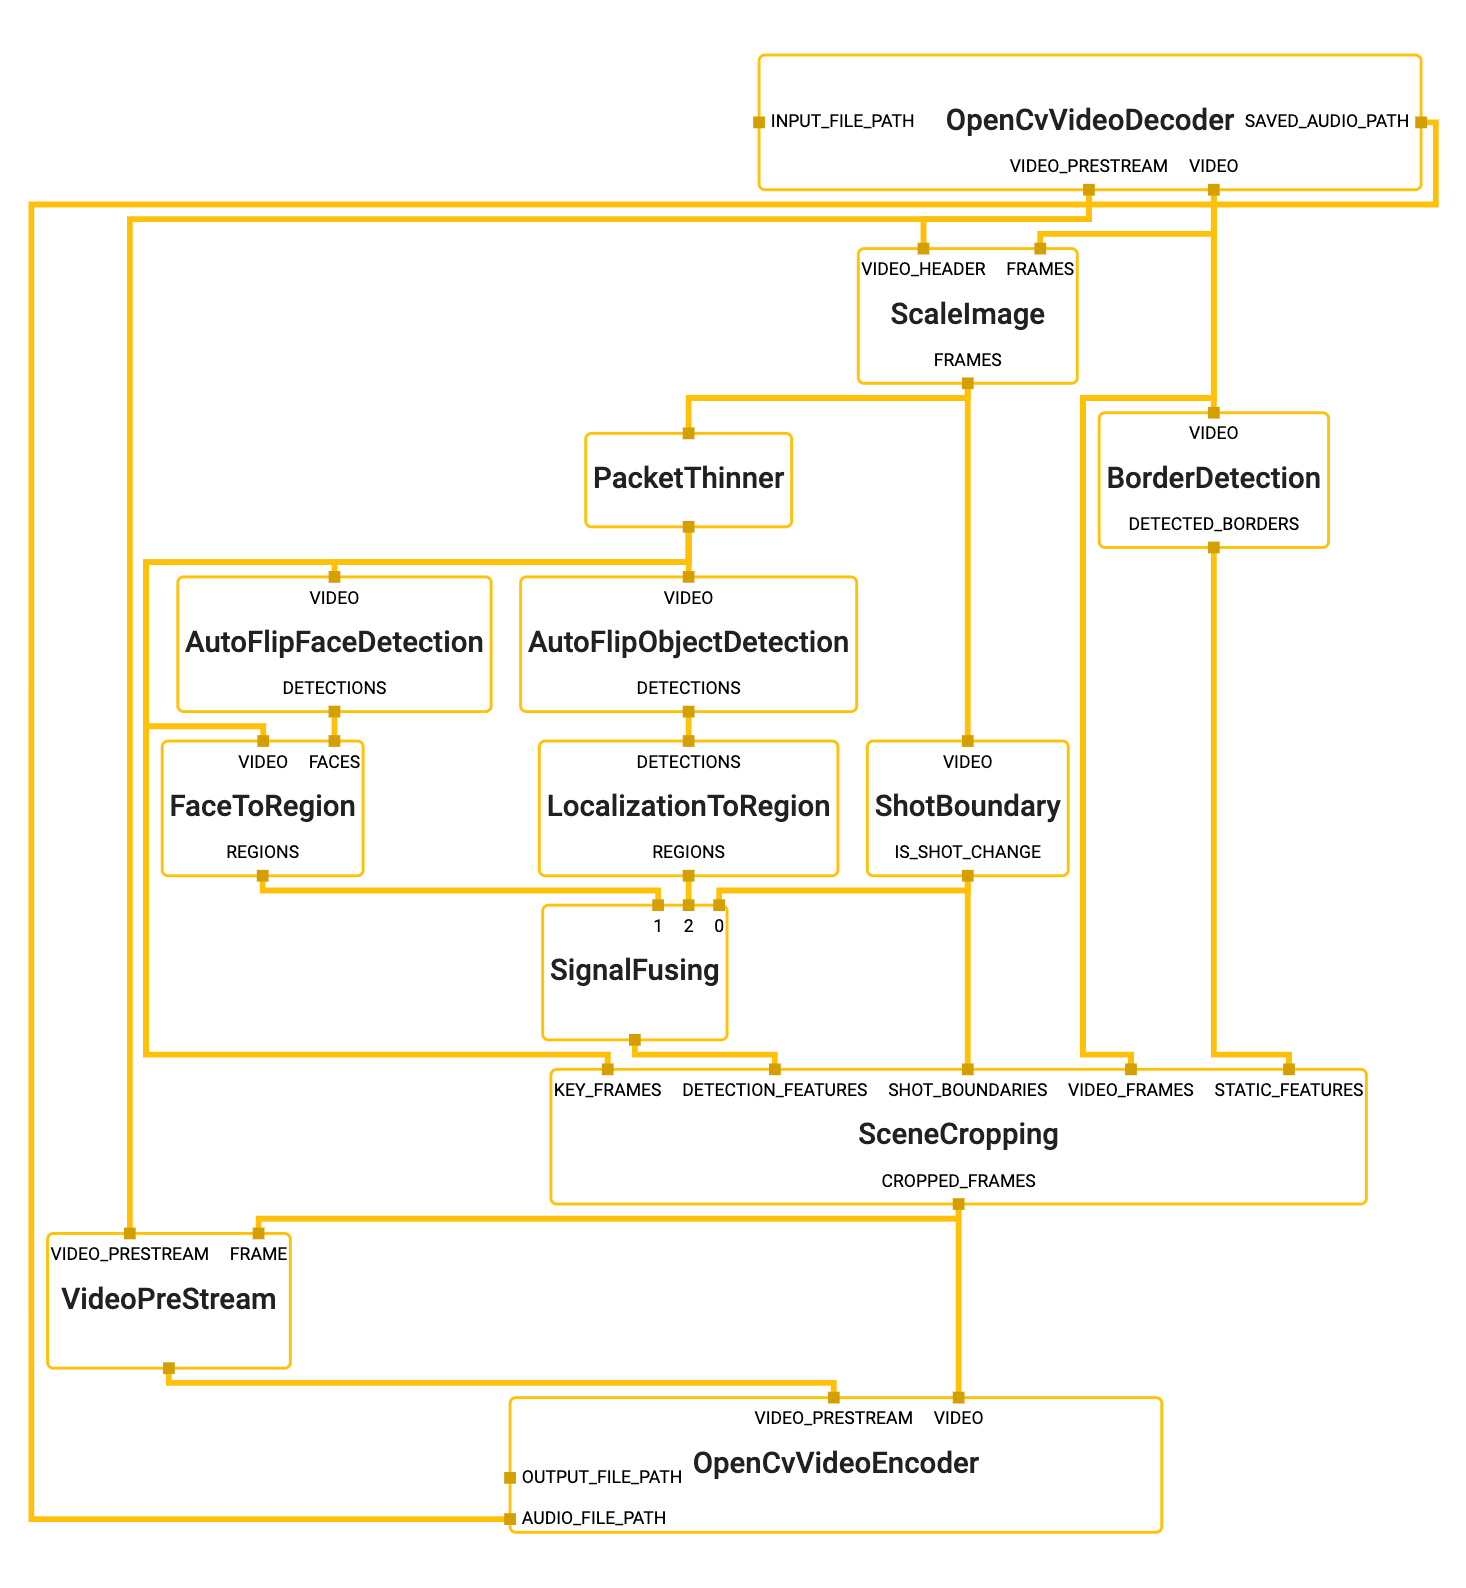
To visualize the graph as shown above, copy the text specification of the graph below and paste it into MediaPipe Visualizer.
# Autoflip graph that only renders the final cropped video. For use with
# end user applications.
max_queue_size: -1

# VIDEO_PREP: Decodes an input video file into images and a video header.
node {
  calculator: "OpenCvVideoDecoderCalculator"
  input_side_packet: "INPUT_FILE_PATH:input_video_path"
  output_stream: "VIDEO:video_raw"
  output_stream: "VIDEO_PRESTREAM:video_header"
  output_side_packet: "SAVED_AUDIO_PATH:audio_path"
}

# VIDEO_PREP: Scale the input video before feature extraction.
node {
  calculator: "ScaleImageCalculator"
  input_stream: "FRAMES:video_raw"
  input_stream: "VIDEO_HEADER:video_header"
  output_stream: "FRAMES:video_frames_scaled"
  node_options: {
    [type.googleapis.com/mediapipe.ScaleImageCalculatorOptions]: {
      preserve_aspect_ratio: true
      output_format: SRGB
      target_width: 480
      algorithm: DEFAULT_WITHOUT_UPSCALE
    }
  }
}

# VIDEO_PREP: Create a low frame rate stream for feature extraction.
node {
  calculator: "PacketThinnerCalculator"
  input_stream: "video_frames_scaled"
  output_stream: "video_frames_scaled_downsampled"
  node_options: {
    [type.googleapis.com/mediapipe.PacketThinnerCalculatorOptions]: {
      thinner_type: ASYNC
      period: 200000
    }
  }
}

# DETECTION: find borders around the video and major background color.
node {
  calculator: "BorderDetectionCalculator"
  input_stream: "VIDEO:video_raw"
  output_stream: "DETECTED_BORDERS:borders"
}

# DETECTION: find shot/scene boundaries on the full frame rate stream.
node {
  calculator: "ShotBoundaryCalculator"
  input_stream: "VIDEO:video_frames_scaled"
  output_stream: "IS_SHOT_CHANGE:shot_change"
  options {
    [type.googleapis.com/mediapipe.autoflip.ShotBoundaryCalculatorOptions] {
      min_shot_span: 0.2
      min_motion: 0.3
      window_size: 15
      min_shot_measure: 10
      min_motion_with_shot_measure: 0.05
    }
  }
}

# DETECTION: find faces on the down sampled stream
node {
  calculator: "AutoFlipFaceDetectionSubgraph"
  input_stream: "VIDEO:video_frames_scaled_downsampled"
  output_stream: "DETECTIONS:face_detections"
}
node {
  calculator: "FaceToRegionCalculator"
  input_stream: "VIDEO:video_frames_scaled_downsampled"
  input_stream: "FACES:face_detections"
  output_stream: "REGIONS:face_regions"
}

# DETECTION: find objects on the down sampled stream
node {
  calculator: "AutoFlipObjectDetectionSubgraph"
  input_stream: "VIDEO:video_frames_scaled_downsampled"
  output_stream: "DETECTIONS:object_detections"
}
node {
  calculator: "LocalizationToRegionCalculator"
  input_stream: "DETECTIONS:object_detections"
  output_stream: "REGIONS:object_regions"
  options {
    [type.googleapis.com/mediapipe.autoflip.LocalizationToRegionCalculatorOptions] {
      output_all_signals: true
    }
  }
}

# SIGNAL FUSION: Combine detections (with weights) on each frame
node {
  calculator: "SignalFusingCalculator"
  input_stream: "shot_change"
  input_stream: "face_regions"
  input_stream: "object_regions"
  output_stream: "salient_regions"
  options {
    [type.googleapis.com/mediapipe.autoflip.SignalFusingCalculatorOptions] {
      signal_settings {
        type { standard: FACE_CORE_LANDMARKS }
        min_score: 0.85
        max_score: 0.9
        is_required: false
      }
      signal_settings {
        type { standard: FACE_ALL_LANDMARKS }
        min_score: 0.8
        max_score: 0.85
        is_required: false
      }
      signal_settings {
        type { standard: FACE_FULL }
        min_score: 0.8
        max_score: 0.85
        is_required: false
      }
      signal_settings {
        type: { standard: HUMAN }
        min_score: 0.75
        max_score: 0.8
        is_required: false
      }
      signal_settings {
        type: { standard: PET }
        min_score: 0.7
        max_score: 0.75
        is_required: false
      }
      signal_settings {
        type: { standard: CAR }
        min_score: 0.7
        max_score: 0.75
        is_required: false
      }
      signal_settings {
        type: { standard: OBJECT }
        min_score: 0.1
        max_score: 0.2
        is_required: false
      }
    }
  }
}

# CROPPING: make decisions about how to crop each frame.
node {
  calculator: "SceneCroppingCalculator"
  input_side_packet: "EXTERNAL_ASPECT_RATIO:aspect_ratio"
  input_stream: "VIDEO_FRAMES:video_raw"
  input_stream: "KEY_FRAMES:video_frames_scaled_downsampled"
  input_stream: "DETECTION_FEATURES:salient_regions"
  input_stream: "STATIC_FEATURES:borders"
  input_stream: "SHOT_BOUNDARIES:shot_change"
  output_stream: "CROPPED_FRAMES:cropped_frames"
  node_options: {
    [type.googleapis.com/mediapipe.autoflip.SceneCroppingCalculatorOptions]: {
      max_scene_size: 600
      key_frame_crop_options: {
        score_aggregation_type: CONSTANT
      }
      scene_camera_motion_analyzer_options: {
        motion_stabilization_threshold_percent: 0.5
        salient_point_bound: 0.499
      }
      padding_parameters: {
        blur_cv_size: 200
        overlay_opacity: 0.6
      }
      target_size_type: MAXIMIZE_TARGET_DIMENSION
    }
  }
}

# ENCODING(required): encode the video stream for the final cropped output.
node {
  calculator: "VideoPreStreamCalculator"
  # Fetch frame format and dimension from input frames.
  input_stream: "FRAME:cropped_frames"
  # Copying frame rate and duration from original video.
  input_stream: "VIDEO_PRESTREAM:video_header"
  output_stream: "output_frames_video_header"
}

node {
  calculator: "OpenCvVideoEncoderCalculator"
  input_stream: "VIDEO:cropped_frames"
  input_stream: "VIDEO_PRESTREAM:output_frames_video_header"
  input_side_packet: "OUTPUT_FILE_PATH:output_video_path"
  input_side_packet: "AUDIO_FILE_PATH:audio_path"
  node_options: {
    [type.googleapis.com/mediapipe.OpenCvVideoEncoderCalculatorOptions]: {
      codec: "avc1"
      video_format: "mp4"
    }
  }
}
Advanced Parameters
Required vs. Best-Effort Saliency Features
AutoFlip allows users to implement and specify custom features to be used in the camera trajectory computation. If the user would like to detect and preserve scenes of lions in a wildlife protection video, for example, they could implement and add a feature detection calculator for lions into the pipeline. Refer to AutoFlipFaceDetectionSubgraph and FaceToRegionCalculator, or AutoFlipObjectDetectionSubgraph and LocalizationToRegionCalculator for examples of how to create new feature detection calculators.
After adding different feature signals into the graph, use the SignalFusingCalculator node to specify types and weights for different feature signals. For example, in the graph above, we specified a face_region and an object_region input streams, to represent face signals and agnostic object signals, respectively.
The larger the weight, the more important the features will be considered when AutoFlip computes the camera trajectory. Use the is_required flag to mark a feature as a hard constraint, in which case the computed camera trajectory will try best to cover these feature types in the cropped videos. If for some reason the required features cannot be all covered (for example, when they are too spread out in the video), AutoFlip will apply a padding effect to cover as much salient content as possible. See an illustration below.
Stable vs Tracking Camera Motion
AutoFlip makes a decision on each scene whether to have the cropped viewpoint follow an object or if the crop should remain stable (centered on detected objects). The parameter motion_stabilization_threshold_percent value is used to make the decision to track action or keep the camera stable. If, over the duration of the scene, all detected focus objects remain within this ratio of the frame (e.g. 0.5 = 50% or 1920 * .5 = 960 pixels on 1080p video) then the camera is held steady. Otherwise the camera tracks activity within the frame.
Snap To Center
For some scenes the camera viewpoint will remain stable at the center of activity (see motion_stabilization_threshold_percent setting). In this case, if the determined best stable viewpoint is within snap_center_max_distance_percent of the frame’s center the camera will be shifted to be locked to the center of the frame. This setting is useful for videos where the camera operator did a good job already centering content or if titles and logos are expected to appear in the center of the frame. It may be less useful on raw content where objects are not already well positioned on screen.
Visualization to Facilitate Debugging
SceneCroppingCalculator provides two extra output streams KEY_FRAME_CROP_REGION_VIZ_FRAMES and SALIENT_POINT_FRAME_VIZ_FRAMES to visualize the cropping window as well as salient points detected on each frame. You could modify the SceneCroppingCalculator node like below to enable these two output streams.
node {
  calculator: "SceneCroppingCalculator"
  input_side_packet: "EXTERNAL_ASPECT_RATIO:aspect_ratio"
  input_stream: "VIDEO_FRAMES:video_raw"
  input_stream: "KEY_FRAMES:video_frames_scaled_downsampled"
  input_stream: "DETECTION_FEATURES:salient_regions"
  input_stream: "STATIC_FEATURES:borders"
  input_stream: "SHOT_BOUNDARIES:shot_change"
  output_stream: "CROPPED_FRAMES:cropped_frames"
  output_stream: "KEY_FRAME_CROP_REGION_VIZ_FRAMES:key_frame_crop_viz_frames"
  output_stream: "SALIENT_POINT_FRAME_VIZ_FRAMES:salient_point_viz_frames"
  node_options: {
    [type.googleapis.com/mediapipe.autoflip.SceneCroppingCalculatorOptions]: {
      max_scene_size: 600
      key_frame_crop_options: {
        score_aggregation_type: CONSTANT
      }
      scene_camera_motion_analyzer_options: {
        motion_stabilization_threshold_percent: 0.5
        salient_point_bound: 0.499
      }
      padding_parameters: {
        blur_cv_size: 200
        overlay_opacity: 0.6
      }
      target_size_type: MAXIMIZE_TARGET_DIMENSION
    }
  }
}